August 3, 2010

Camping at Buckhorn State Park, WI


Last Monday afternoon we took off for Buckhorn State park. This is a fabulous place to camp with many campsites having their own private beaches. When we arrived we set up our campsite made dinner and jumped in the water. I think I spent the most time swimming since I was a kid. The water was lovely and warm.

The next day we rented a canoe for the morning and explored the shore. There were a lot of interesting fungi and tiny moss and lichens. I love taking pictures of little things the best. 

Lovely Grassy Forest
Our little red Canoe where we beached it to explore
My silly sun hat!   
Adorable mushroom in the moss
This one has grass growing through it!
Phallic 
the ur mushroom

It was really really windy when we were out on the lake so we didn't get far and it started to get really hot so it wasn't the best canoeing time ever but it was still fun.  Eli didn't like it as much as me, he made faces.
Oh Eli!
I'll post about the rest of the trip in a later post, there are lots of lovely pictures to share. 

June 23, 2010

Lady Jane Gloves

So I heard back from Knit Picks today that they are going to publish my very first for-pay pattern!  I went ahead and uploaded it to Ravelry at the 1.99 price point.  I was waiting to upload it until I heard from them so I could decide what price to place it at.  The whole experience ended up being really fun.  My pattern testers were great, my model was awesome and things just really clicked with the whole project.  I think I've learned a lot and have really gained some confidence in my skills.  I have also sent 2 proposals to Twist collective that I'm really excited about so I'll get working on them either way once I know if they are interested.  So anyway, without further ado, here are some of photos of the lovely Michelle wearing the Lady Jane Gloves.

The photo shoot was fun but it was so hot and humid.  I'm glad I didn't do a heavier makeup on her because it would have just run everywhere.  The wind was a bit high too, but that just ended up giving the shots some drama.  These were taken in the area right outside my back door.  I love it because there are so many interesting buildings and alleyways to photograph.  
 
buy the pattern now

April 23, 2010

I'm Turning Japanese Story and (limited) Tutorial

So a while back I watched this video produced by artist Takashi Murakami and directed by McG.  The video starred Kirsten Dunst dressed like a Sailor Moon type character complete with magic wand dancing and singing "I'm Turning Japanese".  (with sparkles!)  I have loved the work of Murakami since being introduced to it about 5 years ago by Eli.  The colorful characters that seem happy and silly, but always with just a bit off about them that makes it all a bit creepy.  The highly graphic and commercial aspects of his work simultaneously revel in and poke at anime and fan culture in Japan.  The light bulb went on in my head as I'd been thinking about doing a new project since my McQueen tribute was on hold due to back-ordered yarn.

I decided I really needed to  make a Murakami inspired sweater. (Also watching the video about 20 times) Fresh off the toil of Eli's vest I was ready to take on another intarsia project and I thought the graphic flowers that populate Murakami's work would make an excellent motif.  So I sat down and began to plan.  I did a gauge swatch in some yarn I had left over from Eli's vest as I wanted to use Brown Sheep's Lanaloft Sports weight again.  I've been a bit obsessed with this yarn and the colors were too perfect so I went with it.  The gauge came out at 6 sts and 8 rows per inch on size five metal needles.   So I went here to get some proportional graph paper to plot out the sweater and make the charts for the flowers.  I particularly like this website because you can make the paper vertical or horizontal, can have 2 different line weights and make paper exactly your gauge.  My grid was exactly half size of my gauge so when I plotted the shaping of the sweater it was exactly half size.  Before I did that with any degree of accuracy I sat down and spent and entire day making the 2 color charts for the flowers.  Using photoshop and a googled reference image I made full color charts for myself to work from.  I made 1 extra chart of the big flower without the black so would know where to put the colors exactly as I intended on embroidering the black in after.

After making the charts I went to Interweave's waist shaping calculator (which is awesome) and made the required measurements of myself and input them.  The calculator is for knitting in the round so I had to do some fiddling with the numbers to make them even so the corrugated rib worked nicely.  I also input no ease into the calculations as I wanted this sweater to be fitted.  I knew it would relax over time and be very comfortable with a small amount of positive ease.  Taking these stitch counts and two pieces of graph paper I printed off I set to work plotting the back and the front onto the graph paper so I could place where and how many flowers were going to go on the sweater.  I had a few false starts.  I had printed the graph paper wrong the first time so the squares were taller than wider which started to shape up into a very tall sweater.  Oops.  I'm glad I caught it.  When I finally had the back plotted out to the bust I started thinking about the shoulders.  I recently bought Ann Budd's book The Knitters Handy Book of Sweater Patterns and I chose the set-in sleeve sweater size that was closest to the stitch counts from the waist shaping calculator.  This was a mistake!  The ease and size of armscye were huge!  The chest size that was the same as mine had a 9in armscye.  I'll get to how I fixed this later.

I dutifully plotted out giant arm holes and placed the flowers on the sweater.  For the small ones I cut out their size square out of some extra graph paper and traced them onto the sweater until I was happy with the placement.  Then I drew some leaves in as the sweater looked a little bare and I didn't want to add more flowers.  With the stems and leaves the front and back looked good and I cast on.   I finished the back and realized looking at it and holding it up to my body that the armscyes were way too long! the waist shaping wasn't hitting at the right point the sleeves would have had to be HUGE.   So I took my favorite and best fitting hoodie and measured both the armscye length and the shoulder rise and calculated that into stitches and revised my graphs.  Then I fixed the back.  The back flower is too close to the top now because of this, but it wasn't bad and I didn't want to reknit half of the back with some of the more difficult color work. I decided I could live with it.  If I had it to do again I would have moved down out of the way of the collar.  

Another thing I did when plotting out the back of my sweater was to make the back narrower than the front by increasing 4 fewer stitches after the waist than the front. I find that if I do this my sweaters fit better and after some measuring I have figured out that my back is narrower than the my front.  Your mileage on this may vary of course, but having a good knowledge of the size of various parts of your body to other parts and of how this may be different than "standard" is really helpful in getting a good fit. 

And so I finished the front and the back and sew them together for a fitting and it was good and I was happy.  I was feeling flummoxed by how to make the puff sleeves I wanted as I couldn't really find any good info on what shape they needed to be in order to look the way I wanted them to look.  So I started on the embroidery and it took what felt like forever.  I think my knit buddies wanted to strangle me.  I had this terrible compulsion to whine about it, all the time.  Silly me!

So I eventually got bored bored bored of embroidery and decided to tackle the sleeve o' doom.  Seriously folks I think by the final edit I had done the sleeve about 7 times.  Really.  I had knit the entire stupid cuff about 3 times and after trying it on deemed it wrong in some way.   

So for those of you skimming this for the tutorial here it is.  How to make a puff sleeve in a set in armscye by picking up and knitting and short rows.  ( Make sure all your seams are sewn before hand)

1.  Starting in the middle of the underarm pick up and knit a stitch for every row all the way around the arm hole.  For the underarm this will be 1 stitch for every underarm stitch.  This is going to give you a lot of stitches and allow the sleeve to "puff"

2.  Knit back to the top of the sleeve (in the round) and knit to about 1.5 in after the shoulder seam.  You are now going to begin short rows by wrapping and turning every row until you've consumed enough stitches to be just short of halfway down the armsyce measuring from the shoulder seam to the underarm.

3.  Now you are going to continue to knit back and forth but instead of wrapping and turning you are going to ssk on the knit side and p2tog on the purlside.  Do this for about 1.5 in or so.   This will give the sleeve some length.  You may want to do this more or less depending on your arms and where you wan the sleeve to end.  I did it 8 times. 

4.  Now knit plain in the round for about 2 inches.

5.  Place marker for underarm stitches and decrease all other stitches by half by k2tog.  I used a trick I learned from Sweater Design in Plain English to wrap the ribbing from the bottom of sweater around my arm at the tension I wanted and count the stitches to know how many to have for the ribbing.   Mine was 64 which was about 4 stitches less than I got by halving the stitches not part of the underarm so I decreased the extra in the next row.  Regardless of weather you need to decrease a few more stitches you should do another row before starting the ribbing so the great number of k2togs don't interact badly with the ribbing.  It can look like there are holes.

And that is how after much trial and error I finished the sleeves.  I did a nifty little i-cord bind off that prevent the corrugated ribbing from curling and kept it tight.  If you use one color ribbing this wouldn't be necessary. 


After finishing the sleeves I picked up stitches in white around the neck to start the collar.  I picked them up from the outside in so that it wouldn't show when you look at it.  I decided on reverse stockinette with garter borders because it would curl over the neckline nicely and  lay flat (because the border)  I knit it flat with a circular needle and slipped the edges to make a little bit lacy decorative edge.  I increased every fourth row every ten stitches with a lifted increase so it would be as invisible as possible.  Its about 2.5 inches long with 4 rows of garter stitch at the edge and 2 edge stitches in garter stitch.  I bound off a bit too tightly and make go back and fix it at some point but for now I'm pretty happy with the way it came out overall and it fits like a dream.  

March 22, 2010

So I finally finished that vest


 So I finally am totally done with the argyle!  After finishing the first vest and having it come out 4" too big in the chest, and doing it all again in a different color, I am very happy with the result.  Eli doesn't like having his picture taken but I explained it was the price he had to pay for hand-knits.  For what it's worth I think he's handsome but he loves to make put-out faces for the camera.  Here is a nice close up of the vest.


The crisscross lines on it are duplicate stitch embroidered after the knitting and sewing together and pretty much everything was done.  It was a bit of a slog, that last bit, I just SO wanted to be done with it!  And so I am.   I really think this was one of the nicer things I've made.  I did make a big modification to the pattern by making it 6 stitches smaller on the front and the back.  I basically followed the directions but just decreased the size.  The pattern was nicely done but I don't know why you'd  want a vest like this to have 4" of ease.  My vest of fail showed that clearly it isn't very attractive.  Who knows?  Do most men really like everything 2 sizes too big?  Anyway here are a few more photo's of Eli hamming it up.  


March 10, 2010

Busy busy!

So I've been obsessively reading the forums on Ravelry and ordered 4 books through inter-library loan and all of this has been about learning to be a designer.  I really want to beef up my skills on designing my own garments and learning to make the things I knit fit better.  The books I got from the library are Elizabeth Zimmermann's Knitting Workshop, Reader's Digest Knitter's Handbook by Montse Stanley, The Essential Guide to Color Knitting Techniques by Margaret Radcliffe, Sweater Design in Plain English by Maggie Righetti, and The Principles of Knitting by June Hemmons Hiatt.

I spent the afternoon browsing these books and I think the most helpful one is going to be the Sweater Design in Plain English.  It seems like a really straightforward guide to making garments that fit and work the way you want.  The other books certainly have value (The principles of Knitting had 30 types of cast on) but turned out to be in short supply of the things I really wanted to know.  I used reviews on Amazon to decide what to get from the library because I think I'll likely want to buy the ones that seem most useful. 

The Principles of Knitting is out of print and very expensive to get so I feel lucky that another library was willing to send it here so I could take a look.  It was very talked up but it seems persnickety (she is convinced that there is only one right way to knit) and somewhat dated.  It has a lot of information but most of it I already know and or have for reference in other books.  I'm glad I didn't shell out for in all honesty. 

Of the books I got I think the Color knitting book is the most useless.  There is a little info in there but I think I'd much rather have a book of stranded/fair-isle designs.  A lot of what is in the book is god-awful ugly and will make me not want to use it.  To be fair it did give me the idea to use shaping to make intarsia patterns more than cross-stitch looking.  That was worth walking it home from the library anyway.

On other fronts I've finished the back of Eli's vest and have a few inches done on the front. 


I have a few ends to weave in on the back still and of course the argyle lines to embroider on but this vest is very much actually the right size this time.  I measured.  And measured.  The first one I made came out 4" too big and looked like a really ugly argyle sack on the poor man.  Maybe I'll feel ok enought about someday to take some funny pictures.  

The Alexander McQueen tribute is on a bit of a hold while I wait for more yarn to arrive.  I'm terrible at estimating yardage, but it usually works out ok because I work at the Yarn Exchange and live a block away so I just run and get a bit more.  This time though I bought all 3 skeins that we had of the Lanaloft Bulky in Cottage White so I'll have to wait until we get more in.  I did have to frog a bit of it because of an irredeemable and complicated-to-explain mistake so I took some pictures of my progress off the needles.  Its coming along just like I planned!  What a good feeling despite the mistake.  It was a bit fun to frog it on the floor like that. 

March 6, 2010

Thoughts

I had a fun moment of magical thinking the other night when the fan in my computer decided to stop working. I decided I would take it apart and see if I could see what was wrong. I finally got it apart (after taking out about 100 screws) and saw nothing wrong but dust and cat hair so I vacuumed it out and spun the fan around a bit and screwed it back together and then it worked fine. *shrug*. Who knows?? The power of randomly taking shit apart I suppose. It's out of warranty now so I figured I couldn't mess it up worse.


The object of irritation!

Location:Illinois 38,DeKalb,United States

March 3, 2010

Nifty Thrifty

So I went thrift shopping this afternoon and was rather productive. Uh well I spent a gob of money anyway. I got this lovely tea service with 6 cups and saucers for $15. The only thing missing is the lid to the sugar jar sadly, but I couldn't leave it. Its gorgeous and I didn't have a whole one. So mod. The mark is Melitta, Germany. I got this from Lavish Thrift where I'd been wanting it for nearly a year. It started out at $40 so I don't feel like I've done too badly.


I also went to the new consignment store 2 doors down from me. Its still pretty empty but they had a table full of fantastic jewelry really cheap. Oh I went I bit nuts. I promise I did leave some behind. First up is this lovely pair of gold plated filigree earrings with jade that were $6. I am currently wearing them. They are light and darling.


Next up is the lovely mid century modern sterling fish pin. This guy was sooooo cool. I think he's going to go on my pink cape. He was $7


This is a lovely brass enameled pin that looked really sharp on my green coat. $6


The the most awesome thing was this brass and pearl lapel chain. Oh jeez I saw one of these in a magazine a while back I wanted one bad. Now it is mine! 8$


Then I bought an assorted set of mid century mod drinking glasses and a carafe. They were too much but they make me happy. Plus we've broken a few glasses lately so I think we needed a few that weren't the ugly POM ones. $25 for the set.


March 2, 2010

Swatches swatches

I've been working pretty hard on getting everything ready to start the Idea. I've done my calculations wrote a chart for the stitch pattern and made some really large swatches.


The really large swatches were necessary to see how the worsted and bulky weight yarns handled the stitch pattern. I went through my stitch pattern book several times and found patterns that were close to what I wanted but I ended up writing one that was similar to others, but did exactly what I needed it to.

I've also completed the yoke portion. I don't know how happy I am about it. I'm not sure that portion is going to work, but I'm willing to sit on it until I get the skirt done. I just don't know how it is going to look when it gets sewn to the side. Also I need to frog a bit of the back and make it shorter as it somehow got too long.


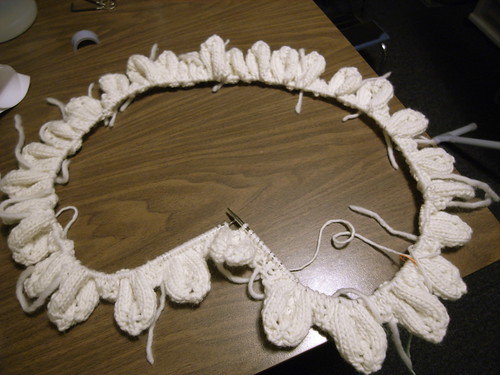
I've made 30 lower portions of the leaf motif as a cast on for the skirt. I realized at some point yesterday that I was really going to need to buy a 60" circular. OMG. The poor thing is stuffed on it. Good thing it has to decrease pretty quickly. One round takes about an hour at this point so I think this thing will take longer than I was thinking. Also I'll probably need more yarn. Oi. I should have known this would get out of hand. :)


February 25, 2010

Testing testing


I am testing this blogger app for my iPhone. I took this picture of Eli and Asuka a couple of weeks ago. Asuka decided she needed to be on Eli's shoulders. Hee.

Location:Illinois 38,DeKalb,United States

February 24, 2010

It's been such a long time...

Lately I've been lured away by facebook, getting out all my little thoughts and dramas in succinct and slightly thoughtless blurbs. But I have had an Idea that will not be quelled and I think the process of working through the Idea is worth documenting in blog format. Anyway the genesis of the Idea began with Alexander McQueen.

As you all may or may not know Alexander McQueen killed himself on February 11th 2010. He was one of the most visionary and artistic fashion designers ever to send a dress down the runway and I actually cried when I heard he had died. I found his work challenging and beautiful and was continually inspired by it. I felt moved to examine my grief for his genius by trying to replicate his aesthetic in a knitted work of my own. I felt very driven to do this and haven't had this fevered a desire in a long time. I began by googling for retrospectives of his work and a few images really grabbed and stood out to me.


What really struck me as overarching theme in lot of his work was a certain historicity, body consciousness and emphasis on texture. I played these ideas around in my head and came up with this sketch.


You'll have to forgive my drawing ability, I'm terribly rusty as I haven't done any real drawing or sketching in years. But the idea is there. I feel like the Idea captures the body consciousness and the textural elements that I was going for. I don't know if anyone but me will ever see Alexander McQueen in it, but if I can pull it off I think I'll feel mighty proud of myself.

I have picked out the yarn and have done some swatching. Here are some photos of the yarn and my work area. I'm really wishing I had a dress form these days.


So the yarn I'm using is Brown Sheep's Lanaloft in Bulky and Worsted. Its a soft single ply wool with a lot of stitch definition and loft. The dark grey will be for the yoke and the cream for the lace portion. I think this dress will need some heavy duty foundation garments but I've been angling for a reason to buy the fancy pair of Spanx I've had my eye on. I'm currently in the process of charting stitch pattern that will be what I want because despite having a pretty comprehensive collection of stitch patterns I couldn't find one that was just what I wanted. It gave me a lot of ideas to make what I wanted after I swatched a few that were similar. I think that this dress will need a lot of negative ease for the lozenge shapes to really pop and It will need a good amount of blocking. The yarn I'm using is pretty thick though, so I think it won't take too long to knit once I've planned it. But oh the planning!

Thinking about making this dress leaves me feeling like I'm standing on the edge of a cliff. The yarn was not inexpensive and I'm afraid to fail to accomplish what I want to do. I've had a lot of trouble lately with large projects not coming out the way I wanted or anticipated so I hope this goes well. I'll need to buy a petticoat for this dress too, and I don't know where or why I'd wear it but it wants to exist so badly I can't help but move right along with it.